Quick and easy photo tips for non-photographers
- Jennifer Finch

- Mar 20, 2022
- 6 min read

As PIOs, many times we are thrown into situations that sometimes push us out of our comfort zone. For some, that push lands us in the realm of photography - we need to get a photo of some person, event, or project for use in a news release, social media post, end-of-year recap, you name it.
Now, you may be thinking - big deal; take the photo and move on. Who cares?
Everyone cares. Now, maybe I’m biased, because photography is my language of choice, but we all know how a good image can capture attention, evoke response, pull at heart strings or just help tell a story better.
So, what’s a non-photographer PIO to do? Follow these three easy steps when taking photos, and your images will be instantly better. Instantly, I tell you!
But wait, there’s more. Today only (and for however long this blog post stays up), I’ll throw in two more tips for free! That’s right. I’m giving you five awesome photography tips for non-photographers for the low, low price of…a like and share to another one of your communication colleagues (you didn’t think I was going to give this away for free did you?!)
Okay, here we go.
Tip #1: Lighten Up
Lighting. It’s the most important thing about photography. In fact, the word photography actually means to write with light. If the lighting isn’t good in your photo, your photo isn’t good. It’s that simple.
So, I’m going to assume when you’re taking photos of employees or elected officials at events, ribbon cuttings, or presentations to community groups, for example, you aren’t hauling around a light kit, which means you have to work with what lighting exists.
Let’s focus on outdoors, as indoor lighting can be tricky if you aren’t using any lighting equipment (but the premises are the same). First, determine what your light source is and from where it’s coming. In most cases, this will be the sun, so that’s pretty easy. Now, you will need to either position yourself (if you cannot move your subject around, such as at a staged event like a ribbon cutting) or your subject so that you are not shooting into the sun. In general, your light source should be at your back or from your side; however, when it’s at your side, beware of shadows, which can make your subjects look harsh.
Now, your subject will complain if the sun is in their eyes, and you will be tempted to let them either stand with their back to the sun (which means bad pictures for you unless you are wanting a silhouette) or they will want to stand in the shade. Shade isn’t bad as long as they are fully in the shade. Watch for shadows from trees, buildings, etc. crossing only part of your subject’s face or body. Also, beware of having your subject in a shadow but the rest of the frame in the light. Your eye will naturally go to the lightest areas of your photo first, which in this case isn't your subject - your subject gets lost in the image.


Tip #2: Watch your back(ground)
If lighting is the most important thing about photography, watching your background may be the second. Good photos instantly become memes when random things are in the background or worse yet coming out of your subject’s head. Don’t let your photo become a meme (at least for this reason).
Before you snap that photo take a quick second to look at the background in your frame - all four corners. Are there people in the background? Do you want people in your background? Is there a trash can or sign in the background that is distracting visually or distracting from the message you are trying to convey? Is there anything coming out of your subject’s head or body that shouldn’t?
Sometimes cleaning up your background is as simple as taking a step or two to the right or left to shift how things appear in the background of your image. Sometimes, if there are people or items in the background that are distracting, you may need to move your subject all together.
So many good pictures don’t come to fruition because of random things in the background that could be eliminated with a simple move to the left or right (or by implementing tip 3 and 4…read on).
(Below: a simple step to the left or right, or even just changing the angle from which you are shooting, can quickly clean up your background and make your photo more visually appealing.)


Tip #3: Go the distance - or don’t, but be deliberate.
So many people take photos from boring distances that don’t make sense visually in comparison to what they are trying to communicate or illustrate. People don’t naturally like to get up close to other people, especially strangers, when taking pictures. And I get it, but when you’re taking a picture for your agency, you are not a people you are a photographer, and photographers don’t mind getting up in other people’s business for a good shot.
Okay, maybe that’s a bit much.
In all seriousness, don’t be afraid to take a few steps closer to the subjects in your grip-and-grin awards shots or group photos. It will make a big difference in the quality of your image. People like to see the people in photos of people. Make sure your audience can clearly see all the beautiful people in your photo.
Perhaps you’re taking a photo of a large crowd at one of your events or a newly renovated park in your community. Step back a bit (or a lot) and capture a wide shot that shows the size or vastness of your subject.
Always taking photos from some mid-distance (not too close but usually always too far) results in, well, boring photos. Be deliberate in the distance from where you shot your image. The result will be a better image.
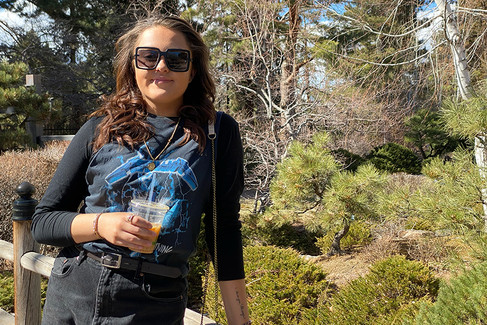
(Below, top row: if what I'm trying to capture in my photo is the size of the plant, I need to move back to capture the entire plant and use my subject for scale. Below, bottom row: if I want to capture my subject enjoying her iced coffee (which really should just be an IV attached to her all the time), then I want to make sure that I'm showing the coffee.)


Tip #4: Up, down and all around
Just like the issue with distance, angles can also make or break a photo. If you take all of your photos at eye-level, your photos are, well, boring. Again.
Think about it. Why do we get such a kick out of looking a photos that kids take or photos taken from cameras strapped to dogs (it’s a thing)? It’s because the photos are taken from a different angle.
Most of us view the world from a height of 5’4” to 5’9” (these are the actual average heights for women and men) and that is where most of us take our pictures from - eye level. And since the average size of a forehead is 2.3” for women and 2.8” for men, that means the average height most of your photos are taken at is 5’2” to 5’6”. (And that is as close to math as I care to go on this fine day - if you are right brain dominant, you know what I mean).
Take your photo from a higher vantage point, or lower, depending on your subject matter and purpose. If people are your subject matter, know that angles can imply attributes. Take a photo of somebody from a low angle (therefore looking up at them) implies that person is important and powerful. The opposite can be true when taking a photo of a person from a higher angle (looking down on them).
Below: (We're giving our model a quick break and letting her refill her coffee...again.) Shot from above, this welcome sign of spring isn't very impressive. It's small and competes with the background. In the middle shot, we get lower, which provides a new angle and shows the subject better. In the third shot, we move the the perspective a bit but stay low to the ground to capture a view we don't see often. Depending on the story you trying to tell, the people in the background may or may not be considered a distraction: if you need a picture of the flower, the people distract; if the story is people out enjoying the first signs of spring, the people may help tell that story.)


Tip #5: Be in the know
It sounds silly, but you need to know why you are taking the photo before you take it. What are you trying to say through your image, or, more importantly, what are you wanting people to “read” through your image? Whatever the answer to that is, make sure that is obvious in your photo.
Obviously, these are just a few simple tips to improve your photography, but if you implement them you will notice improvement in your pictures. And pictures, after all, are really just another form of communication. So pair strong pictures with your strong words, and you will be a PIO powerhouse!
If you are ever in Denver, be sure to stop by the Denver Botanic Gardens. Beautiful any time of year, but especially as winter drones on and you just need a touch of spring. Here's my tribute to this oasis 😄.
Comments